Showing posts with label Skybolt. Show all posts

Wednesday, June 9, 2021

FWF Section 45 Cowling: Skybolt and fitting

RV14 Build May 21

Cowling

First thing you need to do is level the airplane. I checked it at several areas but thing the spar is probably the most accurate.

Had to put some wood under the right main, turns out my shop floor isn't level. Maybe that's why when I drop things they magically disappear forever never to be seen again lol.

Getting the angle on the front of the cowling in the center. I thought finding the exact center was super important, but turns out not so much.

To get the cowling to fit at all I had to sand the aft edge down. Use the long sanding block to try and keep it even.

Got the cowling to fit in there, now time to sand and re-fit about 1000 times to get the correct gap.

I used my laser range finder set on the level to measure the edge distance of the cowling to make sure it was centered why I was sanding to fit. The laser worked well and the amount of times I took the cowling off to trim made re centering much faster.


Finally have a 3/16 gap at the bottom edge.

I noticed the cowling isn't sitting flush and it looks like the honeycomb is interfering with the skybolt and had to be shaved.

I marked the interference with a sharpie and started to sand.

Cutting back the honeycomb.

These are the magnetic hole finders for skybolt. Little magnet at the bottom and a chamfered hole to help guide the drill bit.

Magnet hole finders.

Little metal ball showing the hole center.

Dilling, clekoing, and praying.

Step drilling the final hole size. Most of my center hole drills were not exact and in the end it pulled the front cowling forward about 1/32 of an inch.

Installing the skybolt locks.

You install these and then spin them up or down as needed then pull the little round pin in the lower right of the circle to lock the distance. This accommodates different cowling thicknesses.

Skybolt installed and locked. Getting here feels like it takes forever on the cowling work.

Test fitting the lower cowl for trimming.

Trimmed the lower cowling. My trimming of the top wasn't great so I really had to talk myself into trusting my markings.

Glad I did turned out much better.

marking the rivet lines.

Making sure the bottom cowling trim fits.

Holding the bottom cowling tight as possible without warping it and drilling the rivet holes for the hinge.

Hinge is drilled and upper cowl is used as a cutting template for the lower.

Using a feeler gauge to find interference and trim the lower cowling to fit just right.

Lining up the hinges for drilling.

Using the measurements from the book and the rivet spacer to drill the holes.

Lower cowling hinges all drilled.


the long side hinge pin is supposed to rest on top of the vertical pins, but the vertical sat too high so I trimmed the eyelet.

All good now

Using the rivet spacer and measurements to drillth top cowling. I wish I would have transferred the rivet hole lines as well from the bottom. My holes are just slightly off center of the bottom cowling.

Cowling hinges all drilled!

Next I mixed up some epoxy with white tint and covered the cowlings inside. I ended up putting 3 layers on to make sure I had good coverage.

Installing the lower cowl heat shield

This took awhile but it turned out nice. Last step is to cover it with epoxy to seal the seams.


Then I drilled the nutplate holes and installed the nutplates.

installed the hinges.


Clekoed the inlet ramps inplace and marked where they touch the top cowl. There was some trimming to get them to fit well.


Sanded away the epoxy in the contact area.

Sanded the inlet ramps to help with a smooth transition.

Layed up micro in the sanded areas.

I sanded and put more micro in and sanded until I was happy with the transition.
Third times a charm..

Finally happy.

Added 1 more layer of epoxy to seal the top cowl.

Cowling 48.5 Hours


Tuesday, January 19, 2021

Section 45: Cowling Mod Skybolt and Carbon Fiber

RV14 Build December/January

Cowling

After reading about the top cowling hinge being hard to install and remove especially when the engine is hot I decided to look at Skybolt. I reached out to another builder about his experience with using it and he said he didn't reinforce the cowling as was getting some illowing between the fasteners. After reading dan Horton say 100lb/ft of pressure could be on the cowling and that he would definitely use quarter turns and reinforce with carbon I decided that was the path for me.
RV14 Skybolt

First thing to do is figure out the spacing. The directions are for some of the older RV models and start back with trimming the cowling, but the 14 design makes these steps not necessary. 
RV14 Skybolt

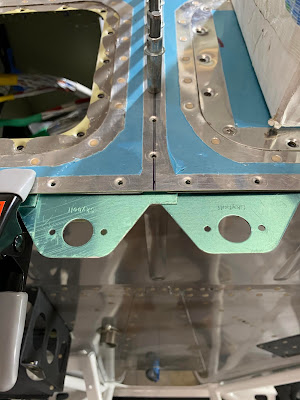
I found that if I went to the 3" spacing from 3.5" I could fit 18 brackets across the top firewall
RV14 Skybolt

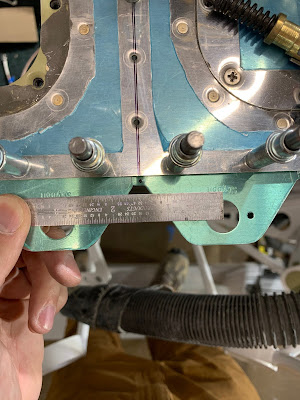
Next I had to find a center and work out towards the edges each way, measuring hole center to hole center as I went. Then clamping the brackets in place for match drilling.

I also measured from the forward skin edge to the end of the bracket hole center.
RV14 Skybolt

and per the instructions the flange overlap area I set a .250. Once everything was clamped and set I drilled.
RV14 Skybolt, RV-14 Skybolt

I kept measuring and tweeking as I drilled. First i used a 3/32 drill and then final drilled with #40.
RV14 Skybolt, RV-14 Skybolt

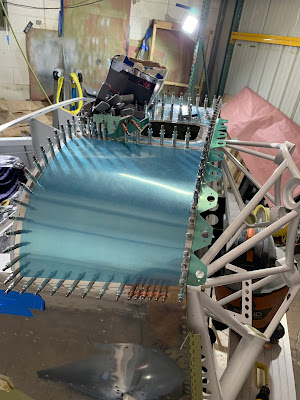
I wanted to carry the brackets down the edge, but the engine mount was too close and this is as far as the piano hinges go so Im hoping with the carbon fiber the cowling will be stiff enough.
RV14 Skybolt, RV-14 Skybolt

RV14 Skybolt, RV-14 Skybolt

All final drilled.
RV14 Skybolt, RV-14 Skybolt

Then I countersunk the holes.

Some of the hols ended up in strange places on the flange overlap. I did my best to counter sink these so that the brackets would all be even.

I didn't get a photo after counter sinking but before this was the spacing for the cowling.

How thick the cowling is before reinforement.

My measurements after countersining gave me a gab of .078" from the top of the skybolt to the top of the forward skin. The Cowling was .050, the 8.8oz unidirectional carbon is .012x2 (layer top and bottom) = .024, and the  2.1oz fiberglass to cover the carbon is .002". This all adds up to .078, which would be perfect if I had a vacuum bag system. In the end the cowling ended up being .094" do to the extra resin from a hand layup.

The unidirectional carbon is extra strong, but the threads holding it together I should have trimmed off the leading edge. It proved troublesome for the fiberglass to lay down on smoothly.

Cutting the fiberglass to length.

After the carbon and the fiberglass I put on the peel ply.

Next day I did the bottom. This time I did trim the white strands form the forward edge, made for a much better layup of the fiberglass overtop.

Top of the cowling after removing the peel ply before sanding.

Bottom after removing peel ply before sanding.

After a few rounds of sanding and micro. I most concerned with the profile since it will be painted.

Final, for now, layer of epoxy.

Final layer of epoxy on the inside. Here I'm most concerned that the carbon is isolated from the aluminum with the fiberglass and anywhere that I might have sanded through with a layer of epoxy, this should stop galvanic corrosion. The bottom of the cowling will eventually get a medium to thick layer of white dyed epoxy to seal the cowling and help find any leaks, so this is good for now.

Final Layer on the top


Since the final cowling thickness was .094" and the gap was only .078" I made extra shims from .020" and plan on ordering an extra set of the shims that came with the kit to ensure the cowling is set as close to flush as possible, or rather the skybolt are adjusted so the cowling is flush in the end.


Shims and brackets ready for primer.

Etched and cleaned ready to prime.

Time to dry.

Looking good! Just need the FWF so i can hang the engine and get back to work!

Section 45 Cowling Skybolt Mod 16.5 Hours

Before Start and First flight testing

 R14 Build August & September 21 Testing Getting into the fun stuf!! Putting gas in for the first time. Have the airplane up to get 15 d...