Saturday, January 30, 2021

Section OP38 Electric Aieron Trim

RV14 Build August

Electric Aileron Trim

Installing the trim was relatively straight forward. First I cut the wing wires to length and re pinned.

After it was pinned I used lacing tape to clean it up.
Then I built the trim motor mount.

Installed the trim motor.

I used a "custom" 12V battery back I made to run the motor to get the arm at 90 degrees. I also previously had bent the arm so that it will hold steel springs off the push rod to help with chafing.


Next I marked on the pushrod the location of the cneter of the arm, then removed the pushrod for drilling.

I drilled and installed the mounts for the spring.

After installing the pushrod I installed the springs on to the trim motor. This is kind of a pain in the ass.


Section OP38 Electric Aileron Trim 6.5 Hours

Thursday, January 21, 2021

43 Engine Installation: Engine Delivery, AntiSplat Moch up

 RV14 Build January

Engine Installation

WHOA!!! The engine is here!! But not the FWF so thats all I can do is be excited lol.


Can't wait to be able to work on this. I need to do all the baffling, install the fuel and oil lines and fitting, remove the impulse mag and install the PMAG, install the upright oil filter adaptor, and the oil/air separator. Lots of things basically.


Working on a double for the air/oil separator. Not sure if im going to install this on the firewall or on the engine mount with adel clamps. Need the engine on the hoist to look at it and decide.

For now I made a rivet pattern for a doubler, something to do while I wait.

Section 43 Engine Installation 1.0 Hours

OP62: New IO-390-EXP199 Mods: Changing the fuselage parts

RV14 Build January

Exp119 Mods

I wish I knew some of this before, but here we are. First change is to change the cowling attach plates. Now that the exhaust exits near the sides and not out the center channel the plates are too long and might cause interference.

First one drilled out and nut plates removed, cut to size and deburred. The black was rattle can paint that I removed and primed the parts with AKZO.

Somehow I managed to cut the wrong side off one of the plates and had to fabricate a new one. This was actually kind of fun rather than waiting on Vans to ship a new part out.

Re-installing these is a little tricky under the engine mount. There isn't enough clearance to use the squeezer so I had to use the rivet gun and bucking bar. Definitely a tight spot.

Getting ready to rivet.

Got it all installed, Time for the other side. I was able to use the squeezer for the nutplates. I put them on last so the wouldn't interfere with the bucking bar.

Next the plans have you "not rivet" these areas, but since the build is well past this point I had to drill these out. I'm waiting on the FWF kit to make sure the holes in the "cowl flap" metal parts line up before I drill these holes out larger for nut plates. Riveting the most aft nutplate on is going to be hard with all the control pushrods in place already.

Marking the rivets that need drilled out.

This is a step that's in the current plans, kind of annoying that its not called up in the normal build. For some reason the right hot air vent gets a cap install on the front and you have to remove the forward pop rivets to rivet it on, as well as sealing it with RTV.

Section OP62 New IO-390-EXP119 Mods 3.5 Hours

Tuesday, January 19, 2021

Section 40B: Landing Gear, Aircraft Specialty Brake Gear Lines

 RV14 Build January

Landing Gear and Engine Mount

After getting lost in the forums I wanted to go with MIL-PRF-83282 brake fluid for its higher temperature rating. So I ordered some Royco 782.

But this still left me with a weak point in the system. The O ring in the Grove calipers, so I upgraded these to M83248/1-222 O rings, surprising hard to find size.

Then I got after installing the aircraft specialty gear leg brake lines. First was to change out the AN fitting on the firewall for an AN3. I really wish I would have done this before the engine mount was one, because it was a tight spot to turn a wrench.

I didn't realize the fittings from the Vans kit were a larger size.

Next I started to route the brake lines. I was a little worried about chafing, even though the braided line is inside a clear tube, I still wrapped some rescue tape around the are near the bottom of the engine mount.

I also still followed the Vans plans and cut some tubing and installed it over the brake line and secured these areas to the gear legs with friction tape.

Friction tape on and the line wrapped around the axle. 

I am a little worried about the vibration and having the hoce chafe on the wheel fairings, I'll have to look into a grommet or sorts of this area. The line does get a little close to the mount bolts for the axle  so I think I'll add a piece of the plastic hose in that area and secure it with friction tape as well.

I figured changing the brake fluid might not happen that often but I might have to bleed them for various reason so I splurged and bought the ATS brake bleeder. It took a little getting use to getting the coupling on and off, but I think it's probably the best way to do the job.

Eventually I got smart and added a line from the reservoir to a catch cup so I wouldn't make a mess.

I did have small air bubble just magically appear over the next few days, so I kept bleeding the system to get them out.

Finally I think I have all the air out of the lines.

The fluid isn't suppose to be stored in the ATS tool so i poured it through a paint filter and into this cup. When I get air bubbles i pour it through a paint filter again back into the ATS bleeder and repeat.


Section 40B Landing Gear 5.0 Hours

Section 31 Fuel System, Aircraft Specialty fuel line and Filters

RV14 Build January

Fuel System

I decided to go with the wing root fuel filter kit from Aircraft Specialty to make future filter cleaning easier and so each tank will have a seperate fuel filter, just in case 1 gets clogged then hopefully the other tank is still good.

Since my wings aren't on yet this is a picture from the website showing the setup.

Since the filter will be in the wing root, no point in keeping the filter in the center channel since it would be too tempting not to service. I luckily still had the AN fitting that came with the fuel pump and installed that first after removing the rigid line I put in.

Installing the metal braided line was a little tricky do to the tight spaces, but I was able to get it on and torqued with a crows foot.

Section 31 Fuel System .5 Hours


Section 45: Cowling Mod Skybolt and Carbon Fiber

RV14 Build December/January

Cowling

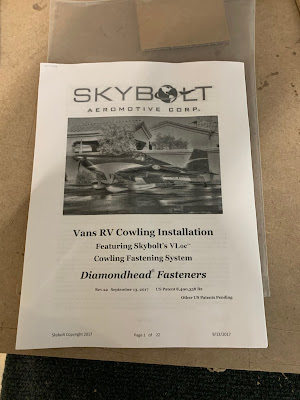
After reading about the top cowling hinge being hard to install and remove especially when the engine is hot I decided to look at Skybolt. I reached out to another builder about his experience with using it and he said he didn't reinforce the cowling as was getting some illowing between the fasteners. After reading dan Horton say 100lb/ft of pressure could be on the cowling and that he would definitely use quarter turns and reinforce with carbon I decided that was the path for me.
RV14 Skybolt

First thing to do is figure out the spacing. The directions are for some of the older RV models and start back with trimming the cowling, but the 14 design makes these steps not necessary. 
RV14 Skybolt

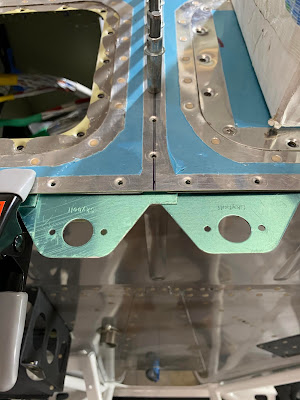
I found that if I went to the 3" spacing from 3.5" I could fit 18 brackets across the top firewall
RV14 Skybolt

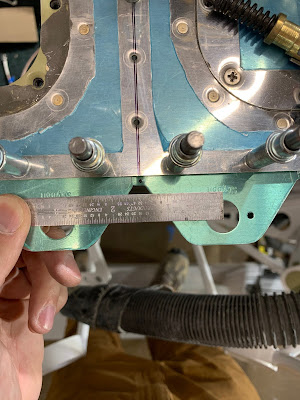
Next I had to find a center and work out towards the edges each way, measuring hole center to hole center as I went. Then clamping the brackets in place for match drilling.

I also measured from the forward skin edge to the end of the bracket hole center.
RV14 Skybolt

and per the instructions the flange overlap area I set a .250. Once everything was clamped and set I drilled.
RV14 Skybolt, RV-14 Skybolt

I kept measuring and tweeking as I drilled. First i used a 3/32 drill and then final drilled with #40.
RV14 Skybolt, RV-14 Skybolt

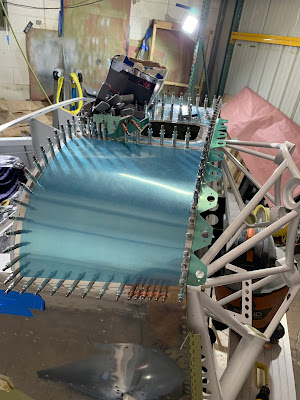
I wanted to carry the brackets down the edge, but the engine mount was too close and this is as far as the piano hinges go so Im hoping with the carbon fiber the cowling will be stiff enough.
RV14 Skybolt, RV-14 Skybolt

RV14 Skybolt, RV-14 Skybolt

All final drilled.
RV14 Skybolt, RV-14 Skybolt

Then I countersunk the holes.

Some of the hols ended up in strange places on the flange overlap. I did my best to counter sink these so that the brackets would all be even.

I didn't get a photo after counter sinking but before this was the spacing for the cowling.

How thick the cowling is before reinforement.

My measurements after countersining gave me a gab of .078" from the top of the skybolt to the top of the forward skin. The Cowling was .050, the 8.8oz unidirectional carbon is .012x2 (layer top and bottom) = .024, and the  2.1oz fiberglass to cover the carbon is .002". This all adds up to .078, which would be perfect if I had a vacuum bag system. In the end the cowling ended up being .094" do to the extra resin from a hand layup.

The unidirectional carbon is extra strong, but the threads holding it together I should have trimmed off the leading edge. It proved troublesome for the fiberglass to lay down on smoothly.

Cutting the fiberglass to length.

After the carbon and the fiberglass I put on the peel ply.

Next day I did the bottom. This time I did trim the white strands form the forward edge, made for a much better layup of the fiberglass overtop.

Top of the cowling after removing the peel ply before sanding.

Bottom after removing peel ply before sanding.

After a few rounds of sanding and micro. I most concerned with the profile since it will be painted.

Final, for now, layer of epoxy.

Final layer of epoxy on the inside. Here I'm most concerned that the carbon is isolated from the aluminum with the fiberglass and anywhere that I might have sanded through with a layer of epoxy, this should stop galvanic corrosion. The bottom of the cowling will eventually get a medium to thick layer of white dyed epoxy to seal the cowling and help find any leaks, so this is good for now.

Final Layer on the top


Since the final cowling thickness was .094" and the gap was only .078" I made extra shims from .020" and plan on ordering an extra set of the shims that came with the kit to ensure the cowling is set as close to flush as possible, or rather the skybolt are adjusted so the cowling is flush in the end.


Shims and brackets ready for primer.

Etched and cleaned ready to prime.

Time to dry.

Looking good! Just need the FWF so i can hang the engine and get back to work!

Section 45 Cowling Skybolt Mod 16.5 Hours

Before Start and First flight testing

 R14 Build August & September 21 Testing Getting into the fun stuf!! Putting gas in for the first time. Have the airplane up to get 15 d...